Guide
360 CTI User Guide for India
Everything agents and admins need to use 360 CTI in India: calling from Salesforce, routing, IVR, voicemail, recordings, AI transcripts and setup.
Read Guide →The full 360 CTI user guide for international numbers: outbound and inbound calls, CTI Setup, Power Dial, IVR, call routing and AI features.
This guide reflects 360 CTI functionality through release v2.106. If your org is on an earlier version, some screens, fields, or options described here may not be available yet.
360 CTI is a Computer Telephony Integration application that is built on the Salesforce platform and is 100% native to Salesforce. It enables users to integrate their telephone systems with Salesforce, allowing them to manage calls and customer interactions directly from their Salesforce environment.
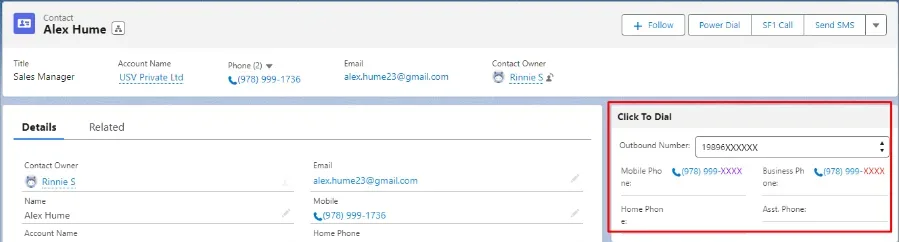
Ways to initiate Outbound calls To make an outgoing call, there are several ways you can do it.
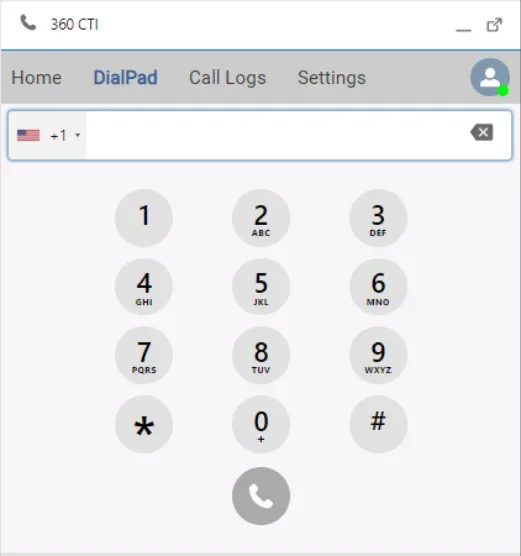
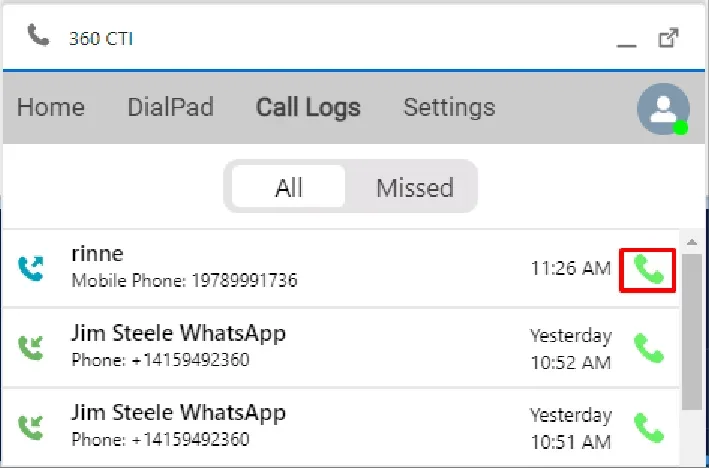
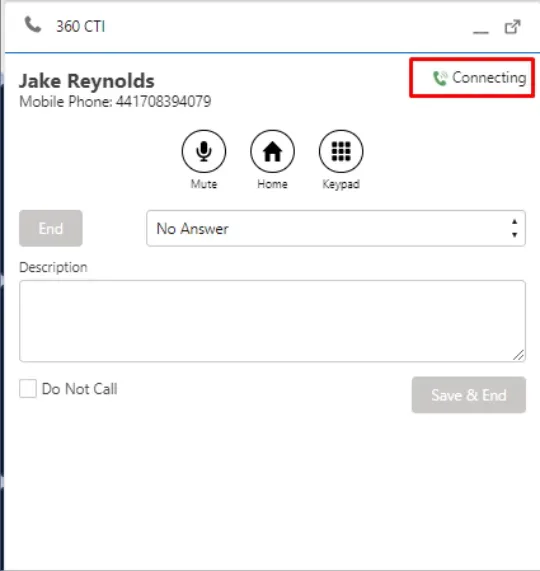
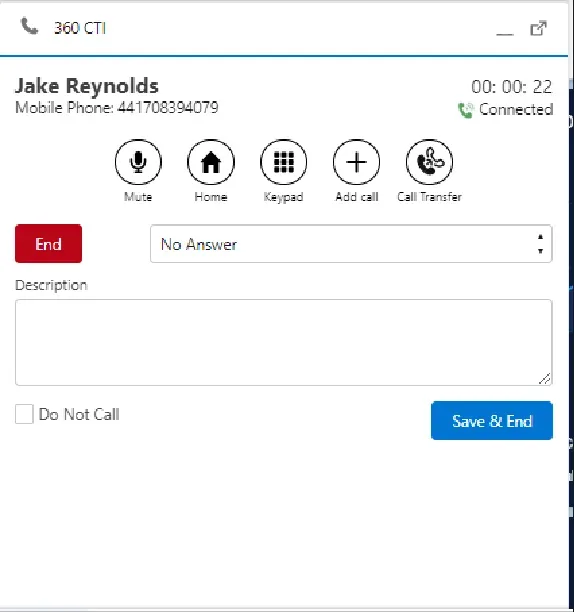
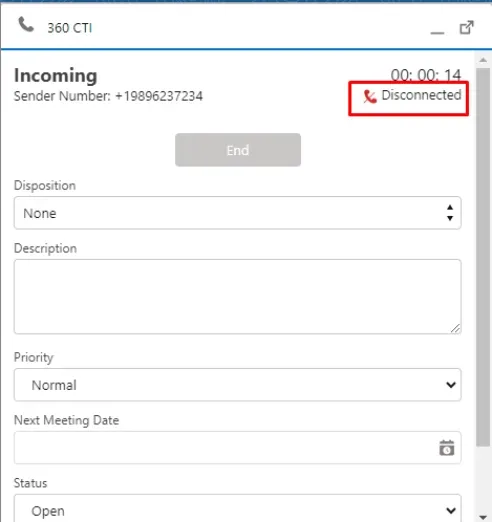
When you make a call through CTI, you’ll see three different stages on the screen:
Connecting and Disconnected.
Incoming Call – Record Association Override When an incoming call comes from a number that matches more than one record (for example a Lead and a Contact), a dropdown appears next to the caller's name on the Softphone. Opening it lists every matching record so the agent can choose which one the call should be associated with. The records listed come from the objects configured on the CTI Object Setup page.
Note: this override is available for incoming calls only.
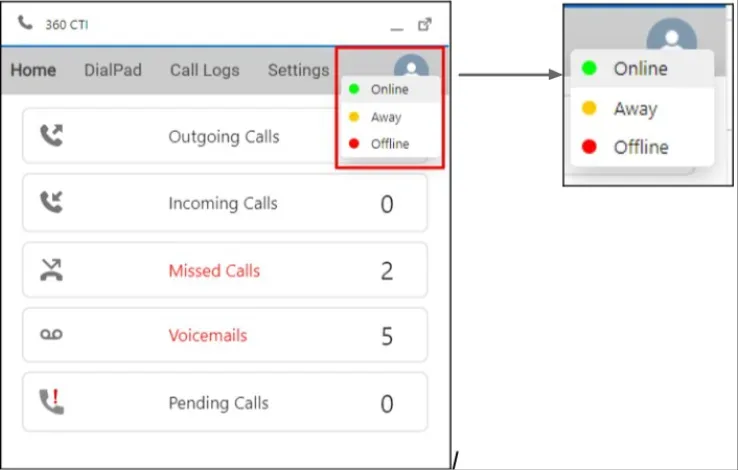
The user has a status indicator in 360 CTI Softphone that shows whether they are currently Online, Away and Offline.


Note: 360 CTI is moving its setup screens from the earlier Visualforce-based interface to a new Lightning Web Component (LWC) interface. The new interface is labeled CTI Setup; the previous one is now labeled CTI Setup Classic. Field names and functionality are unchanged — only the look and navigation differ slightly. This guide reflects the current (LWC) interface.
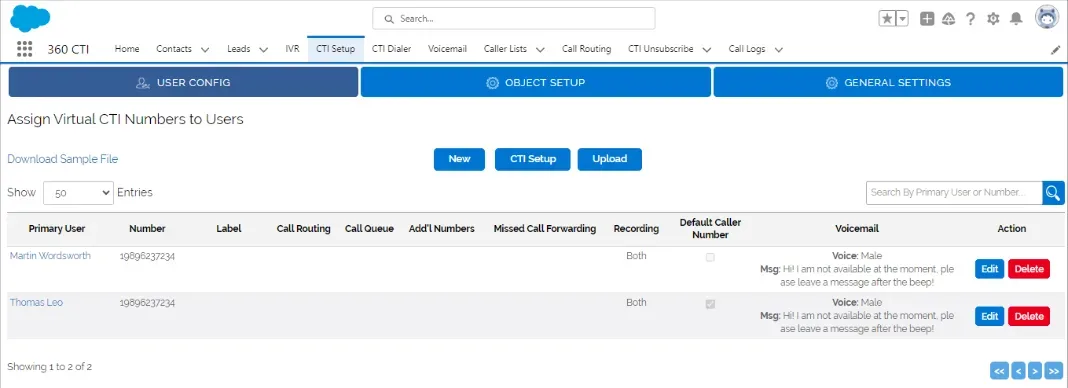
In this User can see the assigned numbers and other details as shown in below figure:
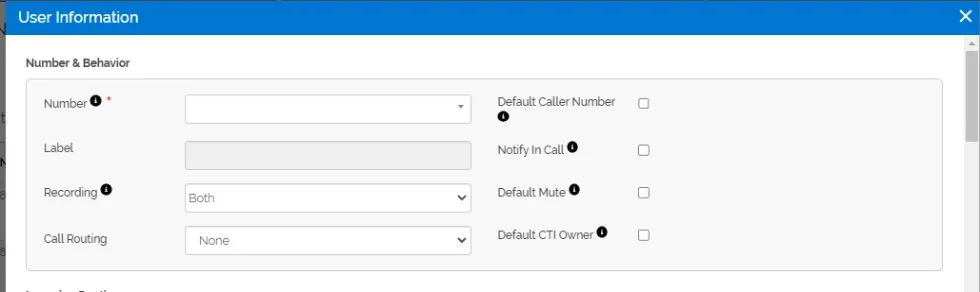
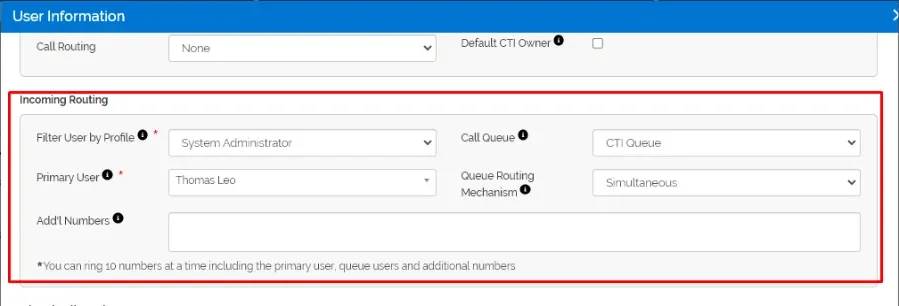
When users click on the "New" button, they are presented with the following options:
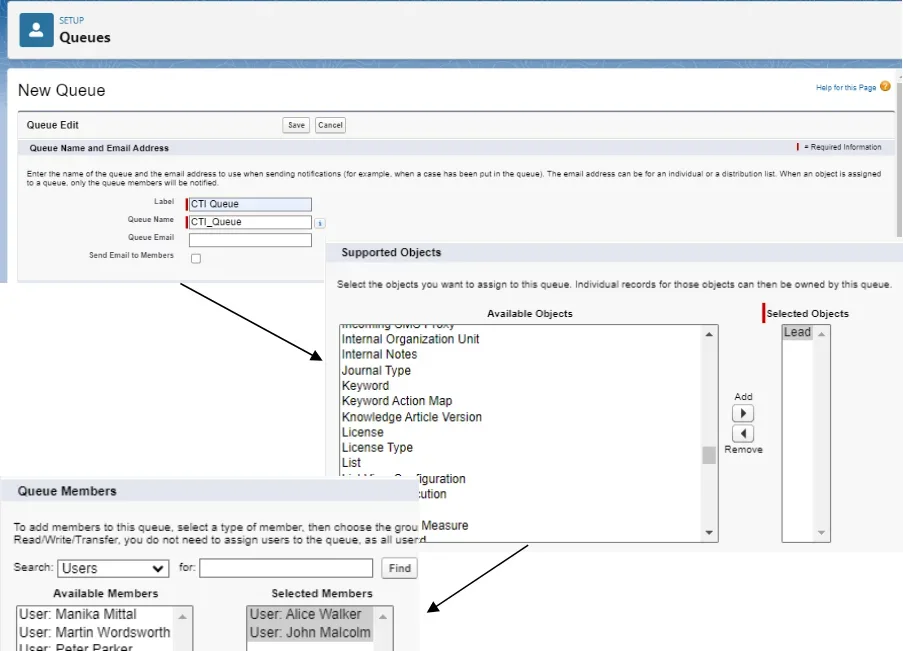
Navigate to the Setup Under Gear Icon in Salesforce >> In Quick Find box search for Queues >> Click to “New” button >> Fill the necessary information (such as- Queue Name and Email Address, Supported Object and Queue Members ) >> Click to “Save” button
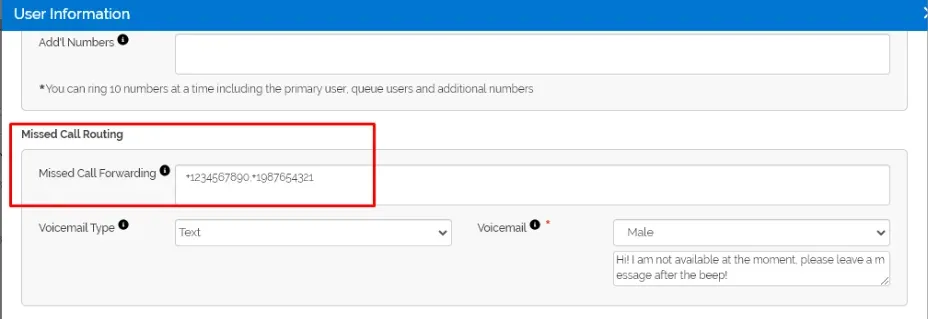
Missed Call Forwarding If you are unavailable to answer incoming calls, you can set up missed call forwarding to redirect those calls to another phone number. You can forward calls to up to 9 additional phone numbers separated by comma.
To enable the missed call forwarding, follow the below steps:
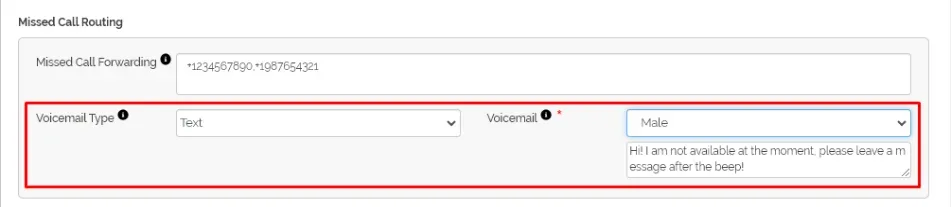
Go to CTI Setup >> User Config. >> Look for the User you want to select and click on the Edit button beside their name >> Go to Missed Call Routing section >> add numbers >> Click to “Save” button
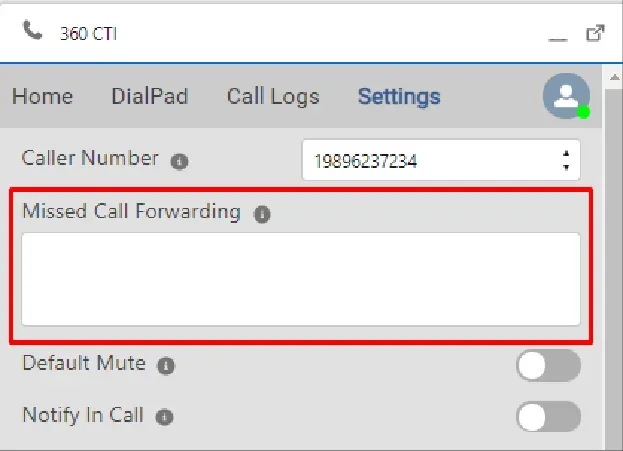
You can also add call forwarding numbers through Softphone. Just go open Softphone then go to “Settings” to access the same.
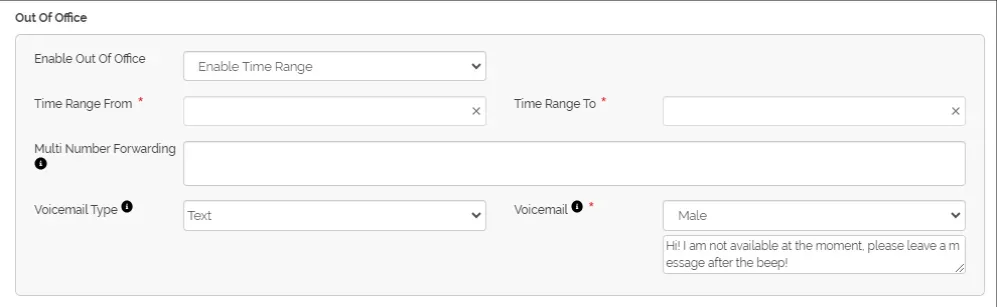
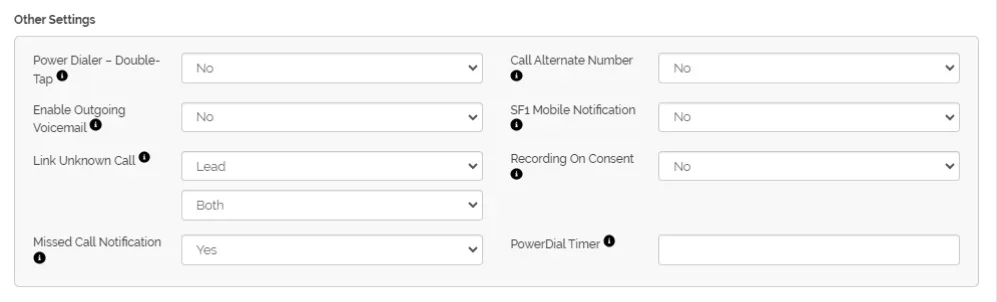
Users can upload sheet in CSV format to populate the user list in User Config.
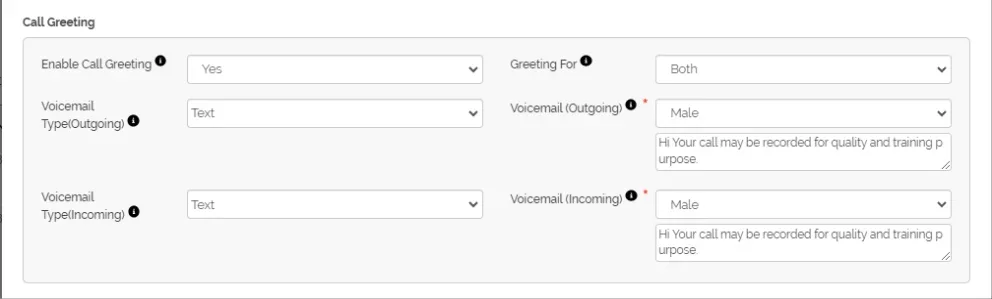
Supported columns include Label, Call Queue, Call Routing mechanism, Voicemail (Text or Voice, defaults to male voice), Call Greeting fields, SF1 Mobile Notification, Hold Music fields, and Enable Announcement fields.
Each user has their own My CTI Setup tab for personal preferences — separate from the admin-level User Config described above. A user must click Edit and then Save at least once for their settings (including Call Score, below) to appear correctly in Reports.
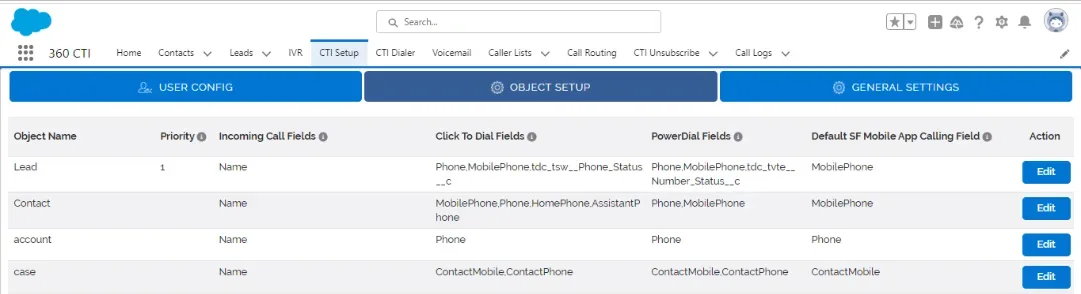
Note: any Salesforce profile with access to the required CTI App objects can now be set as CTI App Owner — this is no longer restricted to the System Administrator profile.

Numbers dialed via Click-to-Dial are also saved in one consistent format (for example +1XXXXXXXXXX) in Call Logs and Task records, with no extra symbols or spacing.
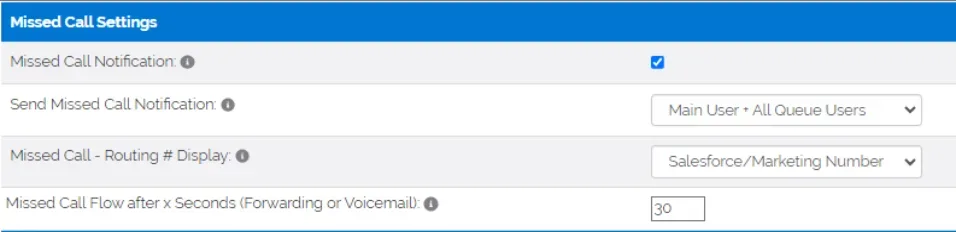

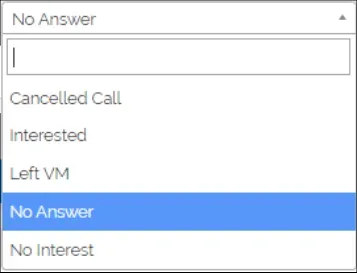
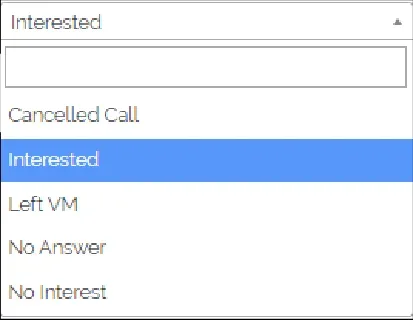
Note: if a disposition screen is left open and a new call arrives, CTI automatically saves and syncs all open Softphone tabs first, so the new call is never mapped to a stale, already-open disposition screen.
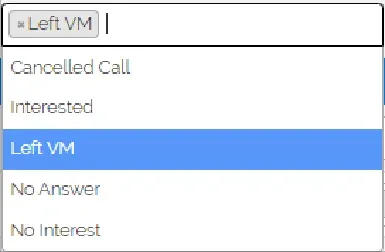
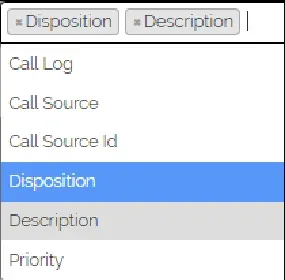

Mute notify incoming call ring
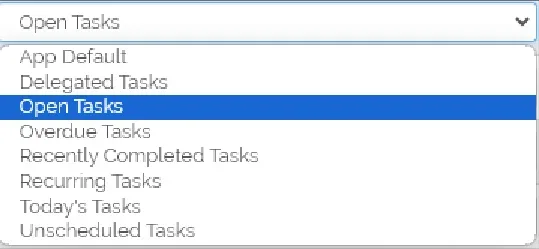
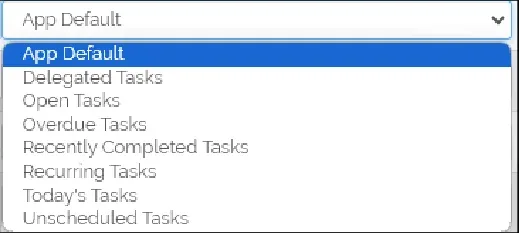
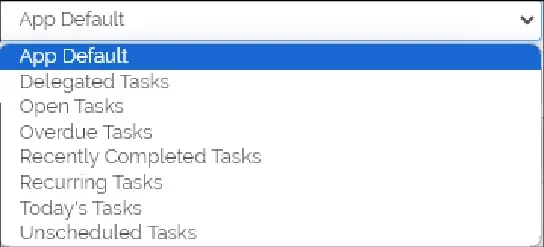

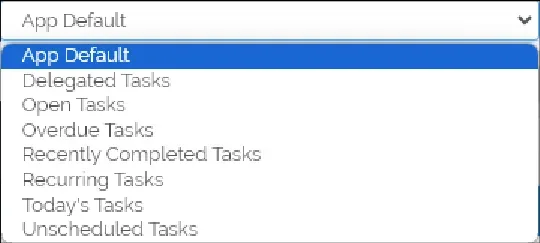
AI Settings, in General Settings, power the OpenAI-based features across CTI: live transcription, Call Coaching, Call Score, and Call Insights.
Note: see Call Transcript, Call Coaching & AI Insights later in this guide for how these settings show up on a call.
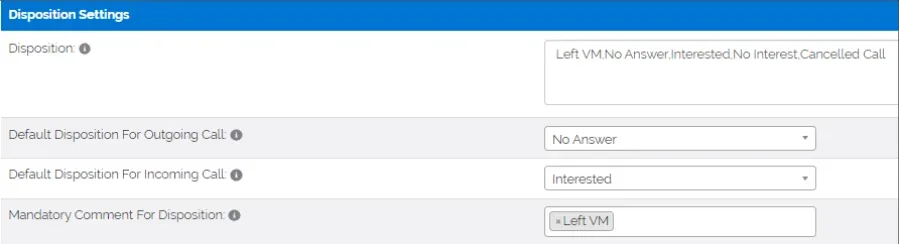
A default disposition refers to a pre-set status or outcome that is automatically assigned to a call, when it is initiated. For instance, Interested, No answer, Nurture, etc.
Follow the steps given below to access Disposition Settings:
Go to General Settings > Disposition Settings > add the default Disposition
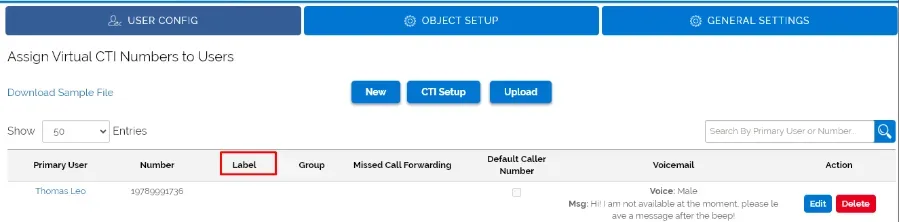
You can label users’ numbers through CTI Setup: User Config to identify multiple numbers.
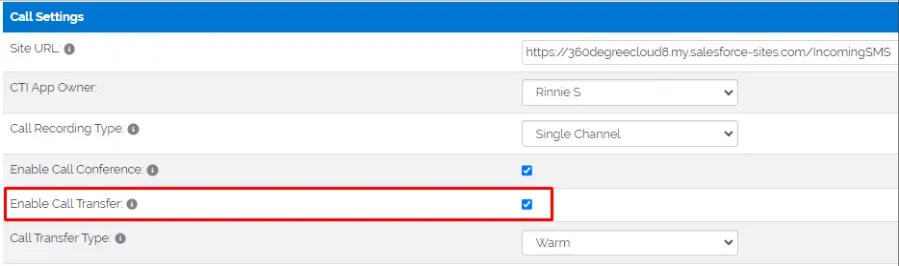
The call transfer feature in 360 CTI allows agents to transfer a live call to another agent within the organization. This can be useful when the caller's issue requires the expertise of another agent or when the agent is unable to resolve the issue on their own.
Follow the steps below to go to Call Transfer settings:
CTI Setup >> General Settings > Call Settings > check the “Enable Call Transfer” box >> Enable the checkbox >> Click to “Save” button
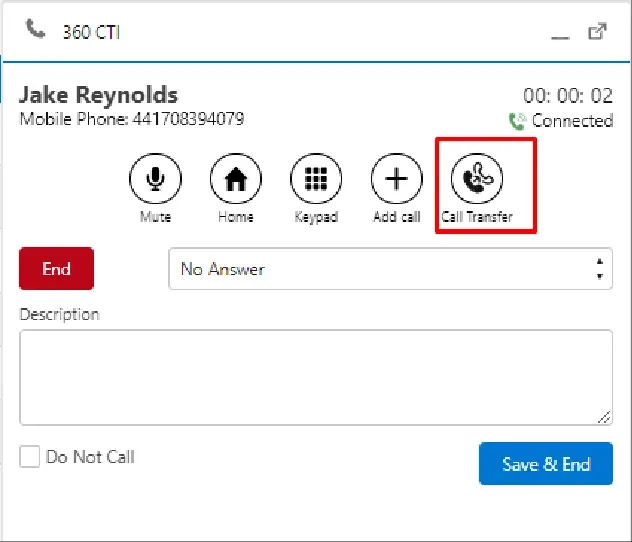
You can transfer a call to someone else through Call Transfer option in the Softphone during an existing call as shown below.
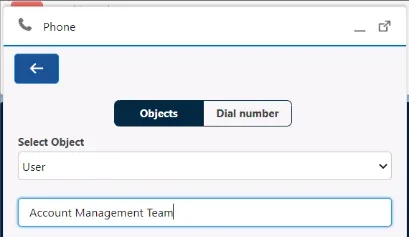
You can transfer the call through an Object. For example: to a Salesforce User
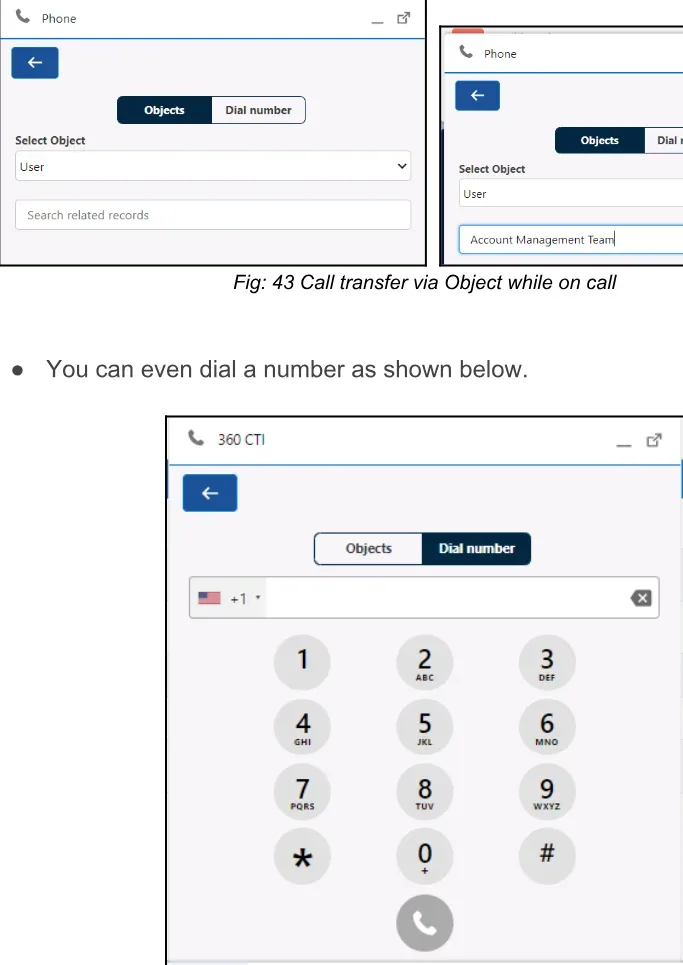
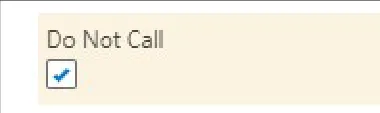
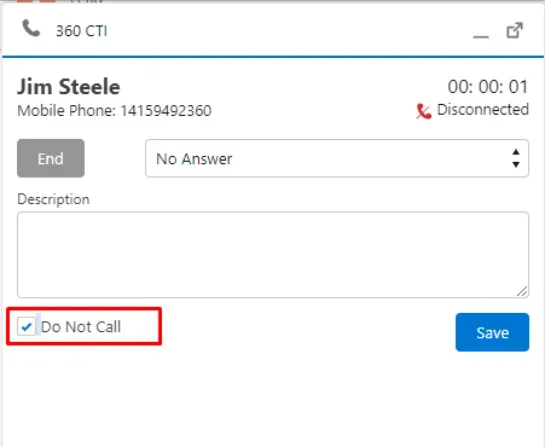
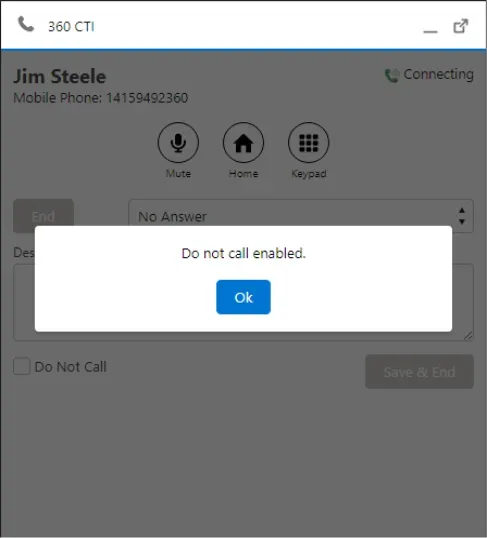
The "Do Not Call" feature in 360 CTI allows customers to opt out of receiving calls from a business. When a customer requests not to be called, the same is enabled by going to their record detail page and enabling the “Do Not Call” checkbox. You can stop calls to that client at record level. So no one from the organization will be able to call that client.
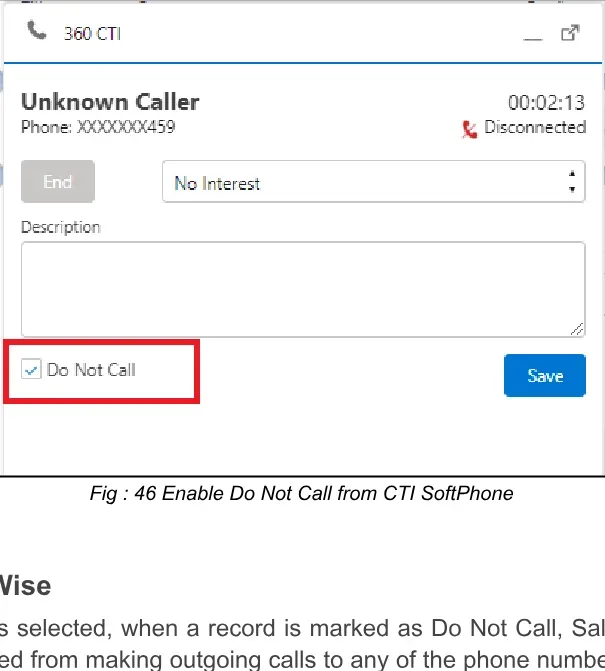
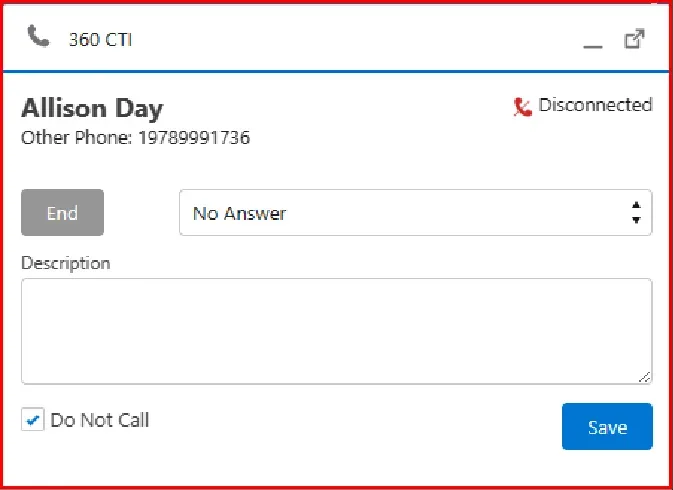
You can also do the same from Softphone. While you are on a call and the customer requests to not call back, you can simply click on “Do Not Call” at the bottom.
If this option is selected, when a record is marked as Do Not Call, Salesforce users will be restricted from making outgoing calls to any of the phone numbers associated with that particular record.

In Record Wise there are two options in Subtype:
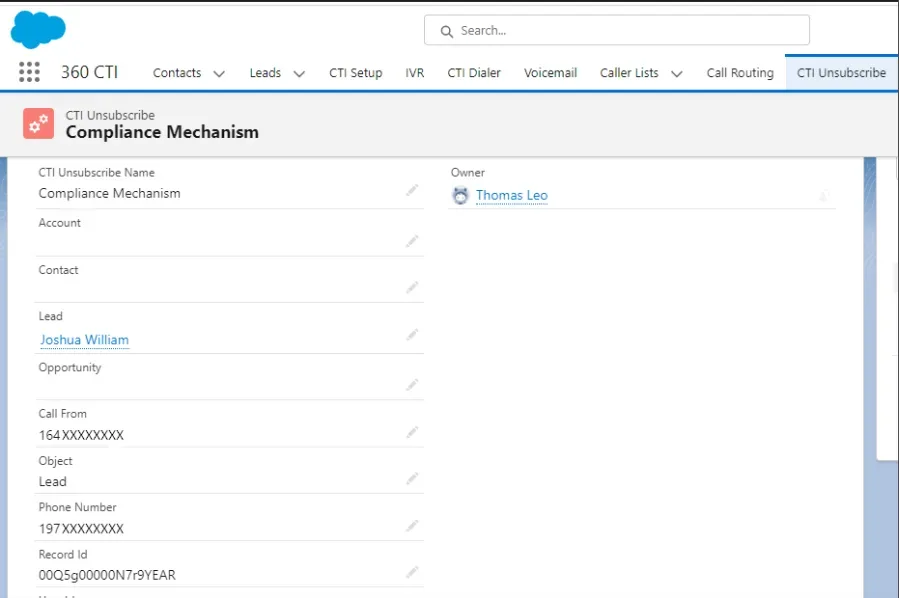
Caller Number-Wise- When this option is selected, if a user initiates an outgoing call to a customer's phone number using a CTI phone number, and the 'Do Not Call' flag is set to true, it indicates that Salesforce users are prohibited from making outgoing calls to that specific customer's phone number using their CTI phone numbers. The 'Do Not Call' restriction applies to the combination of the 'From' (CTI phone number)
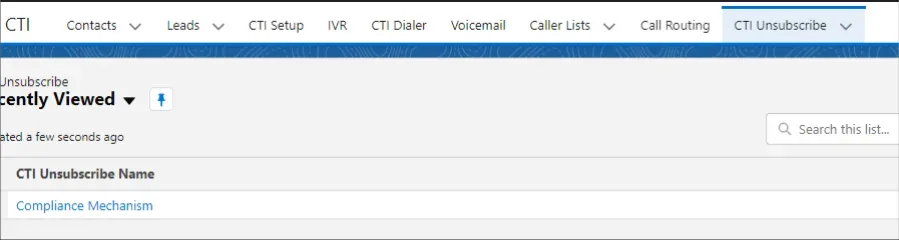
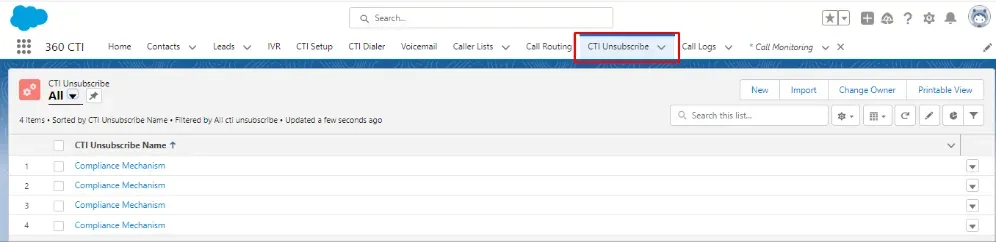
and 'To' (customer's phone number) numbers. To monitor and store this information, there is an object called 'CTI Unsubscribe' that Captures all the necessary details.

Org-Wide- When this option is selected, if a user places an outgoing call to a customer's phone number using a CTI phone number, and the 'Do Not Call' flag is set to true, it restricts the Salesforce user from making any outbound calls to that specific customer's phone number from any CTI phone numbers associated with their office.
This restriction applies even if the Salesforce user has multiple phone numbers at their disposal. To monitor and record this information, there is an object called 'CTI Unsubscribe' that captures all the relevant details.
Note: regardless of which Compliance Mechanism is active, marking a record Do Not Call now always works through the CTI Unsubscribe object — see Do Not Call Functionality for the current step-by-step behavior.

You can input multiple numbers in a comma-separated format, and calls originating from these numbers will not be accepted, with no record of these calls being tracked in Salesforce.
If you choose "No," the recording won't be saved in Salesforce, and storage fees will be incurred according to your storage usage.
For more information please contact: 360 Support team
Disconnected calls, including hang-ups, may remain in the "In Progress" status indefinitely. The scheduler runs every X minutes to identify improperly logged calls and mark them as completed.
You can edit and control the fields that are displayed on CTI Softphone on the Call End screen. Go to General Settings, scroll down to Softphone Settings, and edit Softphone Task Fields.

To enable the Franchise Model, follow the below steps:
General Settings >> turn on Enable Franchise Model >> In the Franchise Name field that appears, enter the API name of the franchise field on your objects (e.g., Franchise_Name__c) >> On each User Config record, set the Franchise Name for that user/number >> Click “Save” button
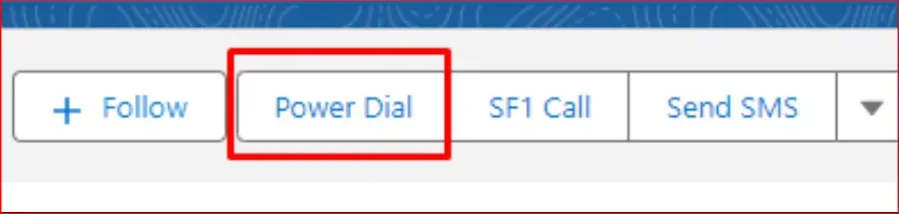
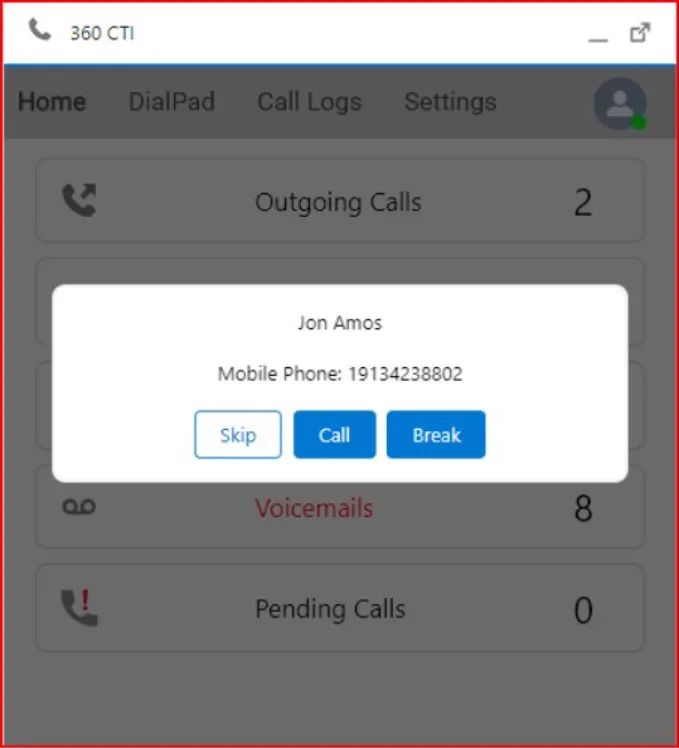
Power Dial functionality is used to call a specified list of users sequentially. The users are put in a specific sequence by the Salesforce list view and then the Power Dial button ensures the function that all the users are called up in a sequence without the need for going to individual records to or to even dial the numbers separately. It also provides you the options to skip a particular contact and also you can break the dialing chain at whatever point you feel the need to do so. This is present as a button on the object record detail page.
Notes:
Once the CTI package is installed, the Power Dial button will be added from the standard objects page layout. For locating the Power Dial button on the standard objects, follow the following steps :
For accessing the Power Dial button on standard objects, follow the following steps:
Open any record of a standard object, for example Lead, by clicking on it.
>> On the top right, you will see a button for Power Dial functionality.
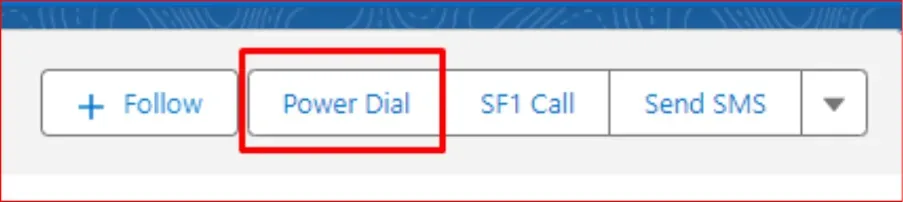
For the custom objects, it is necessary to have the object set up for the CTI Services and then to add the Power Dial button to the page layout.
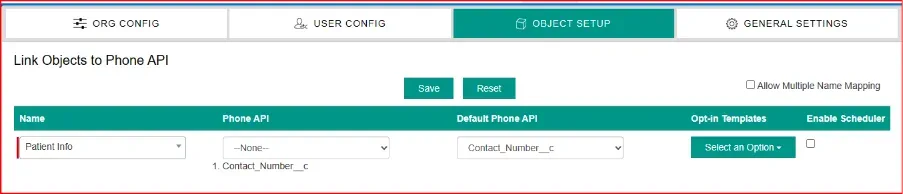
Object Setup for CTI Services For setting up the object for the CTI services, follow the following steps Go to 360SMS App >> Go to SMS Setup tab >> Go to Object Setup >> Select the object and corresponding Phone API fields >> Click on the Save button.
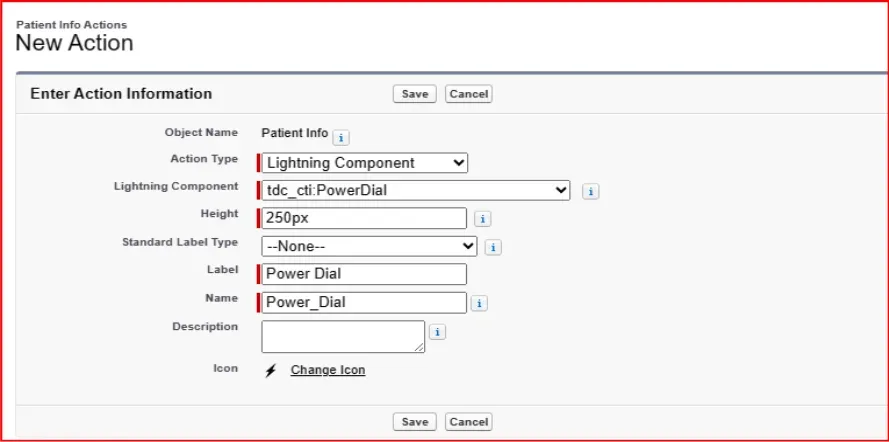
To create a Power Dial button on a custom object page layout, follow the following steps:
Go to setup >> Go to Object Manager >> Go to the Custom Object (here Patient Info) >> Go to “Buttons, Links and Actions” section >> Click on “New Action” button >> Fill up the details as shown in below figure >> Click on save >> Go to the Page Layout for the same object >> From the “Buttons Links and Actions” drag and drop the newly created button on the “Salesforce Mobile ad Lightning Experience” section >> Save the page layout changes.
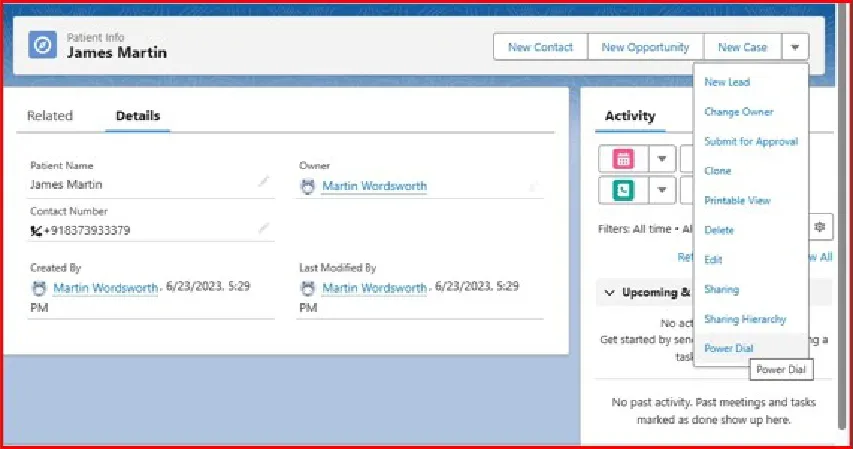
Power Dial on Account Detail Page
For using Power Dial functionality, we will have to create a Split View of the records of the particular object.
Create a Split View Follow the following steps to create Split View:
Go to the object tab >> Select any list view >> Click on the table icon >> Select “Split View”
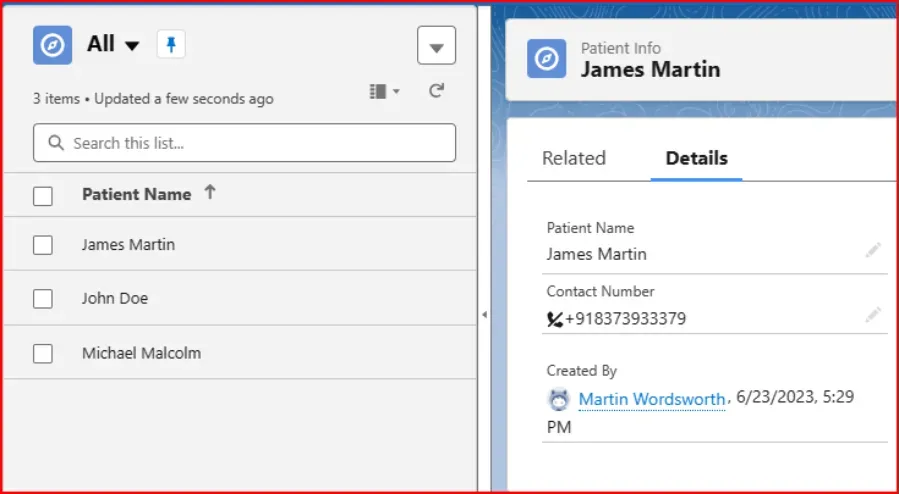
Note:- There is one limitation here. Even if we select random records from the split view, the Power Dial functionality will work in the serial order of the records in the list view. In order to have the Power Dial to work for a specific set of records, you will need to create a special list view for those records, assign them in split view and then use Power Dial.
For Power Dial functionality to function, follow the following steps:
From the split view, click on any record >> Click on the Power Dial button >> 360 CTI Softphone will open which will connect the call to the first user.
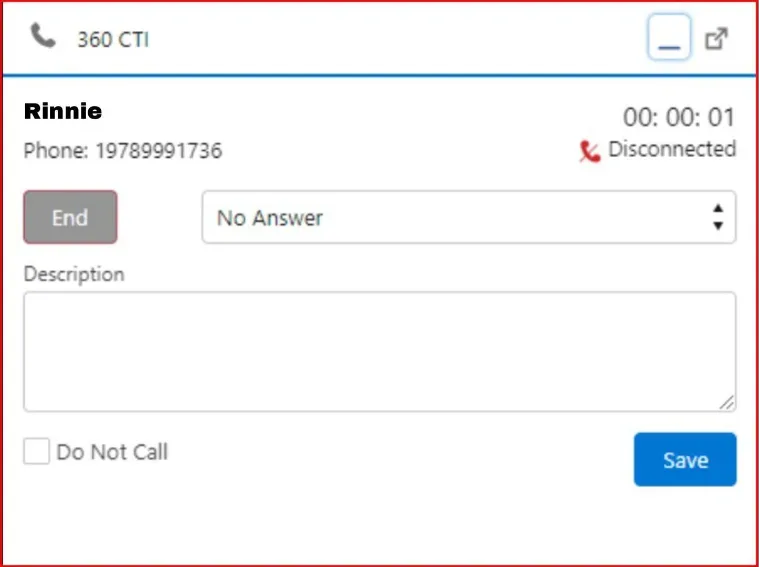
After the call ends, it will ask you to either Call, Skip or Break.
> If you want to skip the next number, you can click on Skip.
> Clicking on the Call button will end up calling the next number.
> Clicking on the Break button will end up the calling chain of the functionality.
> When the user reaches the bottom of the dialer list, he is notified accordingly.
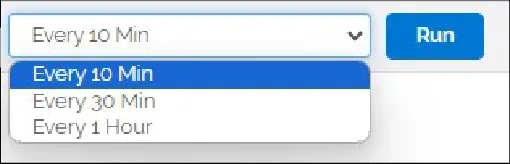
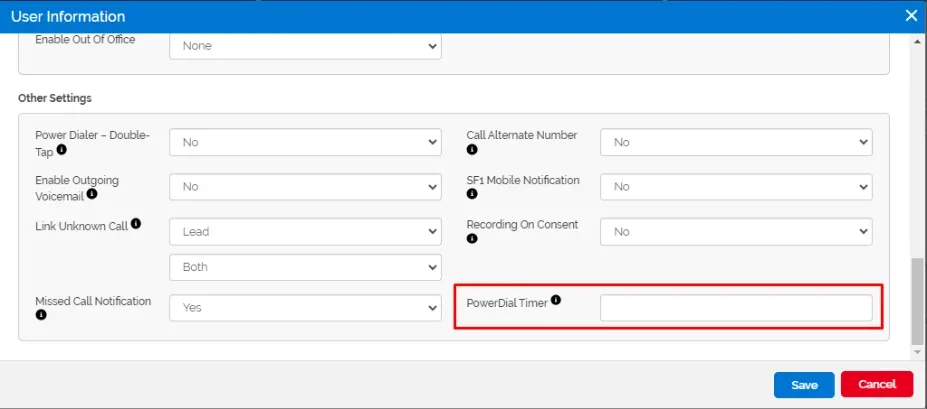
In this feature, User can adjust the interval for automatic calls when utilizing the power dial feature.
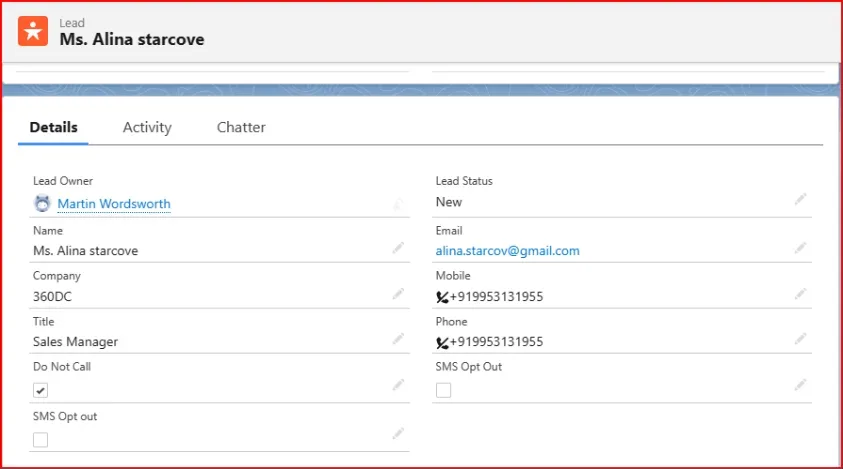
Whenever a particular client user has opted out of the calling functionality, we activate the Do Not Call functionality for the particular user. The Salesforce User won’t be able to call the particular end client until the Do Not Call is disabled from their record.
For enabling the Do Not Call functionality, follow the following steps:
Go to the object record detail page >> Check on the Do Not Call checkbox
For enabling Do Not Call using 360 CTI Softphone, follow the following steps:
Go to 360 CTI Softphone >> Click on Dial Pad >> Enter the number >> Click on Call Button >> Click on Do Not Call checkbox.
How Do Not Call Is Tracked Now Checking Do Not Call — from either the record detail page or the Softphone — now creates or updates a record in the CTI Unsubscribe object to capture the opt-out. It no longer sets the Do Not Call checkbox field on the object record itself.
Note: if any of your reports, list views, or automation key off the object record's own Do Not Call checkbox, they will no longer reflect calling-compliance status — check the CTI Unsubscribe object instead. See Compliance Mechanism > Record Wise.
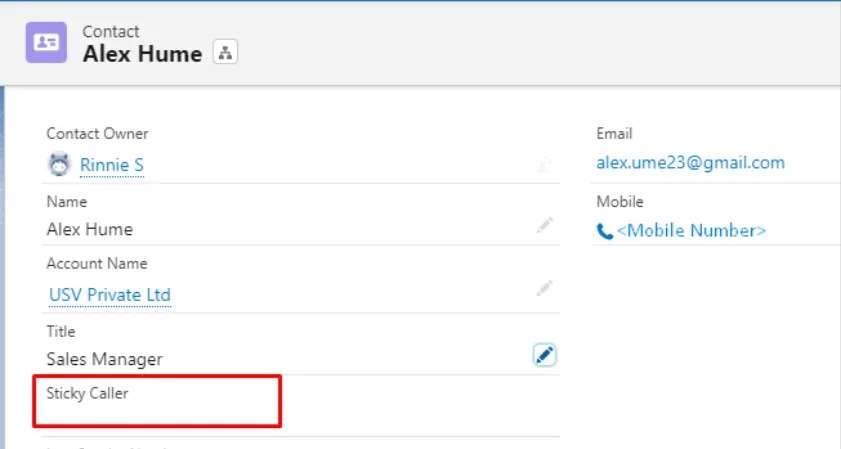
Sticky Caller is a feature in CTI that allows a user to maintain a consistent phone number when making outbound calls. This is particularly useful when a user has multiple phone numbers and wants to maintain a consistent relationship with their customers by using the same phone number for each call.
Sticky Caller can help to improve the customer experience by ensuring that the customer recognizes the phone number and the context of the call. It can also help to improve the user's efficiency by eliminating the need to manually selecting the phone number for each call.
User need to create a field on the desired object with the API name as “Sticky_Caller__c”. You can add this Sticky Caller field anywhere in the record details page.
To add a Click to Dial Component in your org, follow the steps given below:
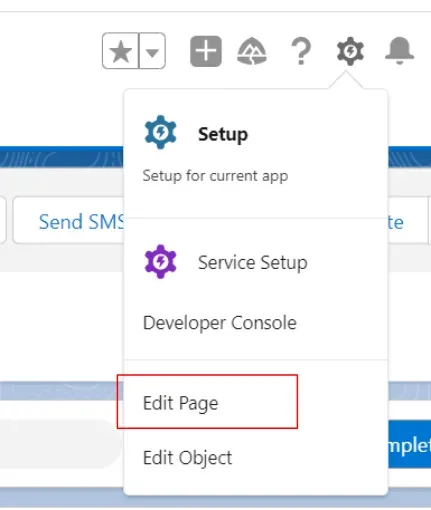
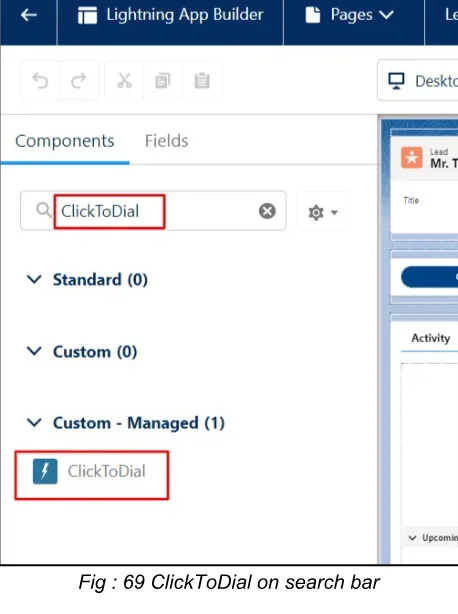
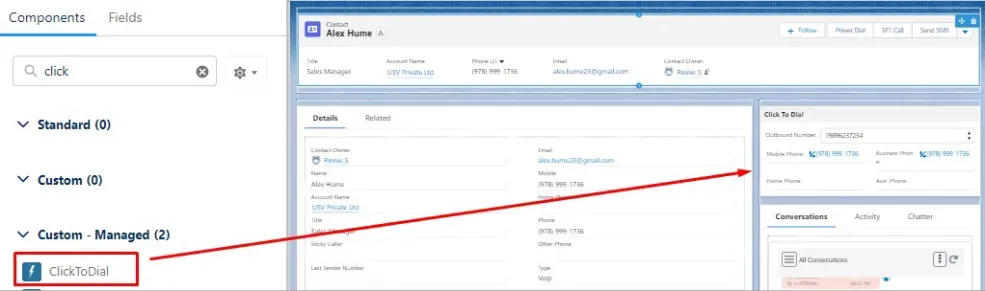
Note: the SF1 Mobile App also has its own Click-to-Dial component, available from the same setup path in the mobile app.
The "Link Unknown Call" functionality within the CTI application serves to create a lead or contact entry in instances of incoming or outgoing calls involving unidentified or unknown numbers. This feature autonomously generates a new lead or contact entry utilizing the respective number. In scenarios where the number lacks an association with an existing lead or contact record, the system generates a fresh lead or contact entry for that specific number. This efficient process guarantees the capture and organization of potential leads or contacts, thereby enriching the comprehensive management of customer relationships.
Functionality- If we get an incoming call from the unknown number, in that case our record will automatically be created as per the selection of the respective object ("Lead" and "Account & Contact.") with fields.
We have two choices: "Lead" and "Account & Contact." If we choose "Lead," we get three options: "Both," "Incoming," and "Outgoing." For "Account & Contact," we also have three options: "Both," "Incoming," and "Outgoing." If we pick "Account & Contact," it means a lead won't be created. Only one thing can be created at a time. The main purpose of this is that whenever a call comes from an unknown number, this function is activated.
Let's say you have a person in charge (Lead), and in the settings for unknown calls, the lead option is chosen for both incoming and outgoing calls. Whichever category you pick for the lead, it will automatically be saved in the chosen respective fields. This happens automatically.
Users can setup the Link Unknown call in General Settings and In User Config.
To setup the Link unknown Calls fields in CTI General Settings , follow the below steps:
Navigate to the CTI Setup Tab >> Go to the General Settings >> Click to Edit Button >> Search for Link Unknown Call under Unknown call settings >> Choose the Respective Object and Type (“Both”, “Incoming” and “Outgoing”) >> Set the fields by providing the values” >> Click on “Save” button Fig : 71 Link Unknown Caller To setup the Link unknown Calls fields in CTI in User Config, follow the below steps:
Go to the CTI Setup >> In User Config click on Edit >> Navigate to the “Link Unknown Call” >> Choose the Respective Object and Type (“Both”, “Incoming” and “Outgoing”) >> Click to “Save” button
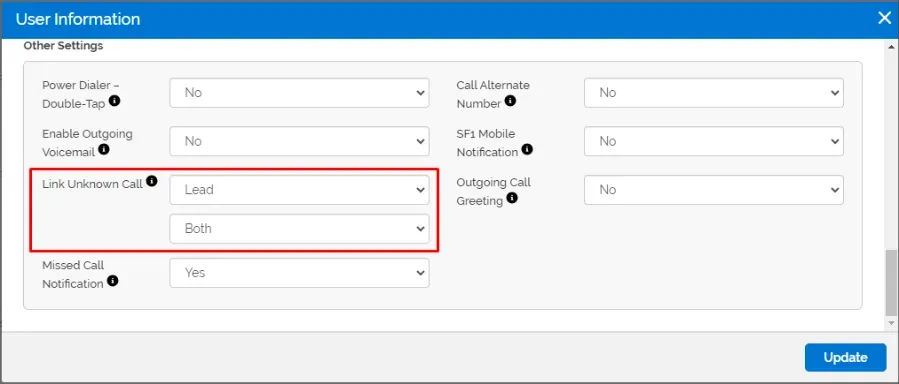
Note- In case Link Unknown Call is set in both User Config and General Settings so priority should be given to User Config.
All of your calls will be recorded and accessible through the task and call logs to ensure that you have a record of all your conversations.
Call Monitoring is a tool that enables authorized users, (such as managers and supervisors) to listen in on live phone calls between customer service representatives and clients.
For Call Monitoring, we need to create the Tab. Below are the steps to create the Tab.
To create the Tab, follow the below steps:
Navigate to the Gear Icon >> Click on “CTI Setup” >> Search for Tabs in Quick find box >> Create Custom Object in Lightning Component Tabs >> Click to “New” >> Select 360 CTI Call Monitoring in Lightning Component >> Click Next >> Click to Save>>Tab will be created.
To assign the Call Monitoring Tab in the Navigation Bar, follow the below steps:
Click on Edit option in Navigation Bar >> Add more items >> Click on All >> Call Monitoring >> Add one new Item >> Click on Save >> The Tab will be added on the Navigation Bar.
Features of Call Monitoring Action Tab - User Status Details: A new section has been added that provides real-time updates on the current status of team members, including whether they are online, offline, on a call, or away.
For Call centers - Businesses can oversee and monitor their call center activities using the call monitoring tool, which can play a crucial role in addressing customer complaints by supplying valuable evidence.
Note: With this functionality, you can monitor one call at a time, and it displays only the live calls in which customers and agents are actively engaging with each other.

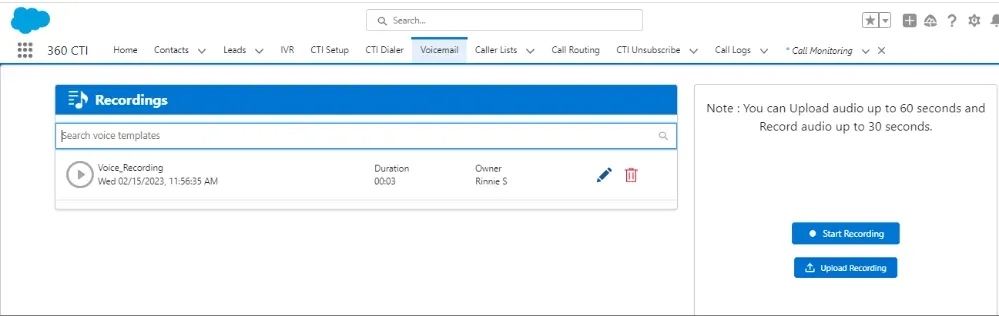
In the Voicemail tab, users can access call recordings and configure their voicemails.
They can either upload a Voicemail audio file or record their own voicemail message.
Note: You can Upload audio up to 60 seconds and Record audio up to 30 seconds.
Enable User-Based Voicemail By default, anyone who can edit a record can see and select any recording in that record's voicemail dropdown. Turning on Enable User-Based Voicemail in General Settings changes this: each user then only sees their own recordings in the dropdown — on the Voicemail tab, User Config, IVR, Call Routing, Calling List, Voice Broadcast, Outbound IVR, and the Voicemail button in the Softphone.
IVR stands for Interactive Voice Response. IVR is a technology that allows a computer system to interact with humans through the use of voice and DTMF (Dual-Tone Multi- Frequency) tones entered via a keypad. It is commonly used in telephony systems to automate interactions with callers, gather information from them, and route calls to the appropriate destination without the need for human intervention.
To access the IVR. User need to go to the IVR tab in 360 CTI app, and select the number for the same.
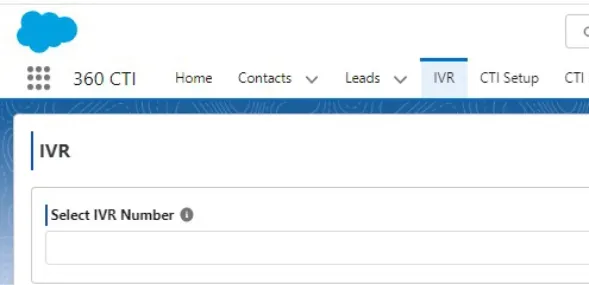
User can set the various options in IVR (as shown in figure):
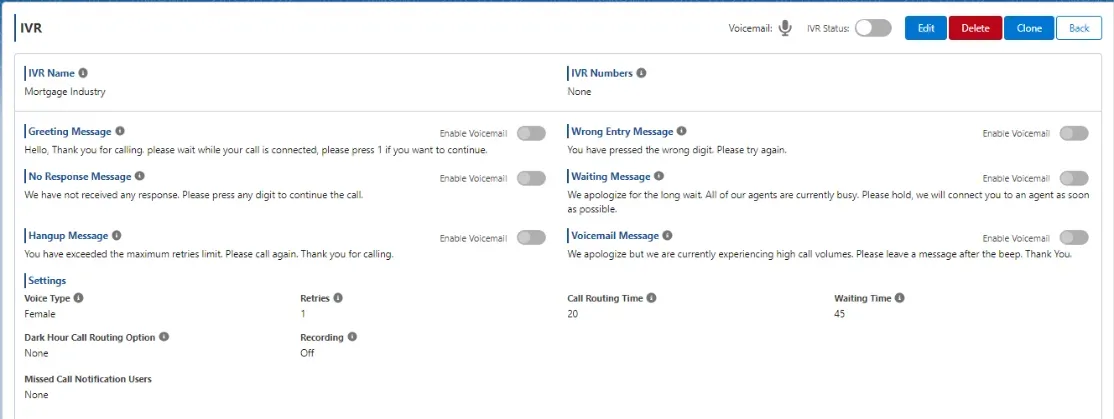
User can also add IVR entries as per their requirement (as shown in figure):

Note- The number that will be used for IVR should not be used for any other purpose.

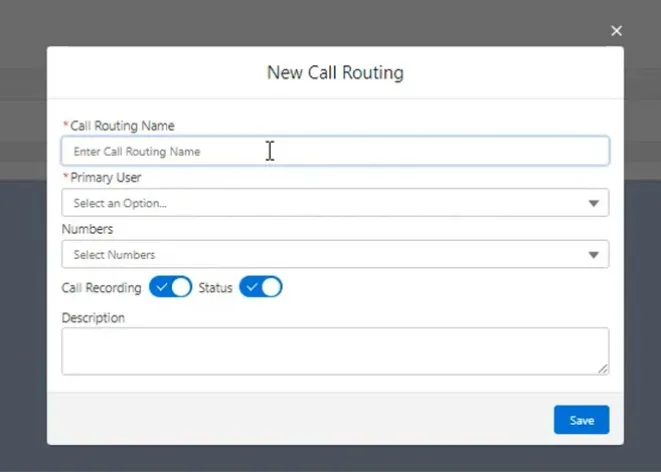
Basic information is given on the call routing screen like name, number description, etc and it also gives you edit option.
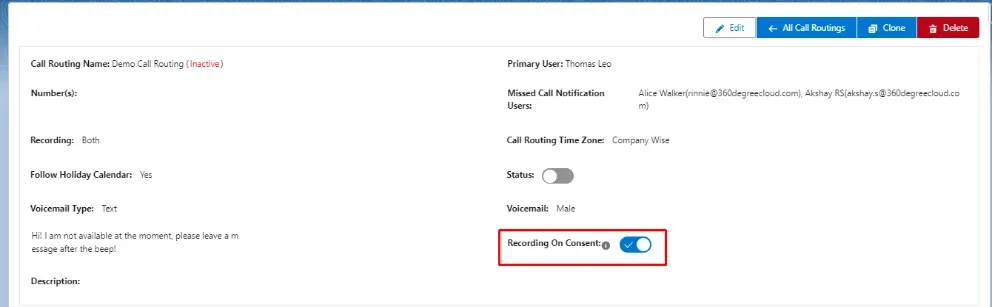
Provides the ability to start or stop recording during a call, based on the customer's consent.
This is useful for complying with legal requirements and managing sensitive information.
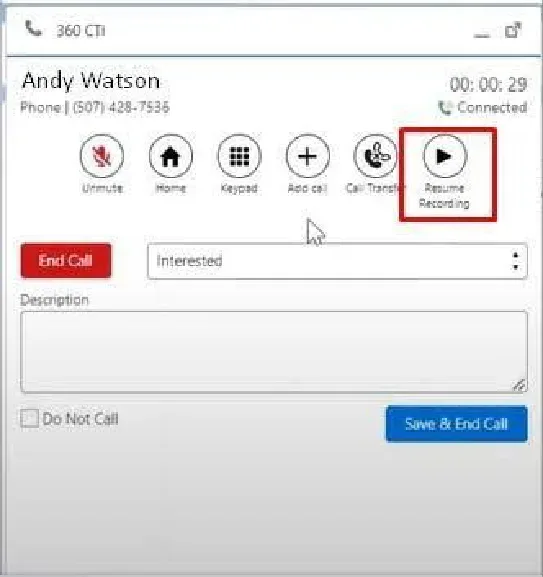
Implemented a mechanism to pause and resume call recording based on agent or customer input.
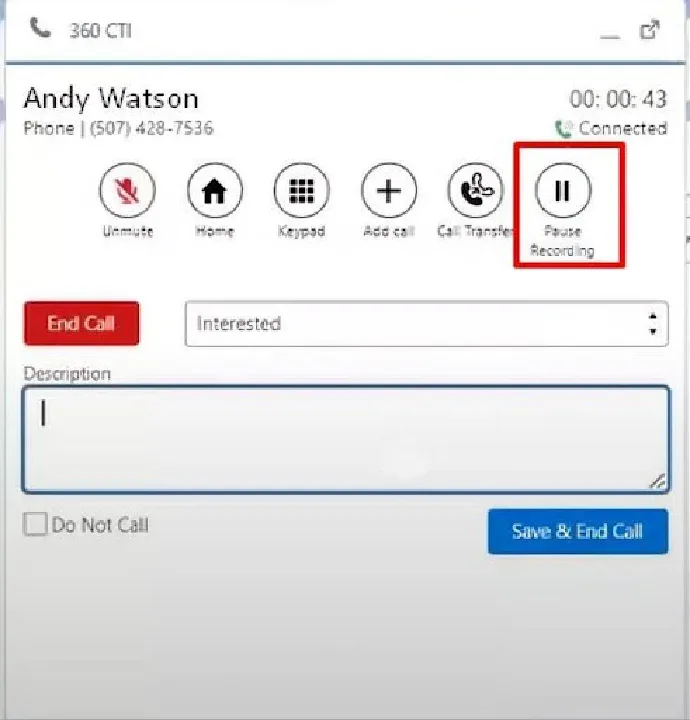
button
The ability to transfer or route calls from one call routing step to another, enabling more complex call flow configurations.
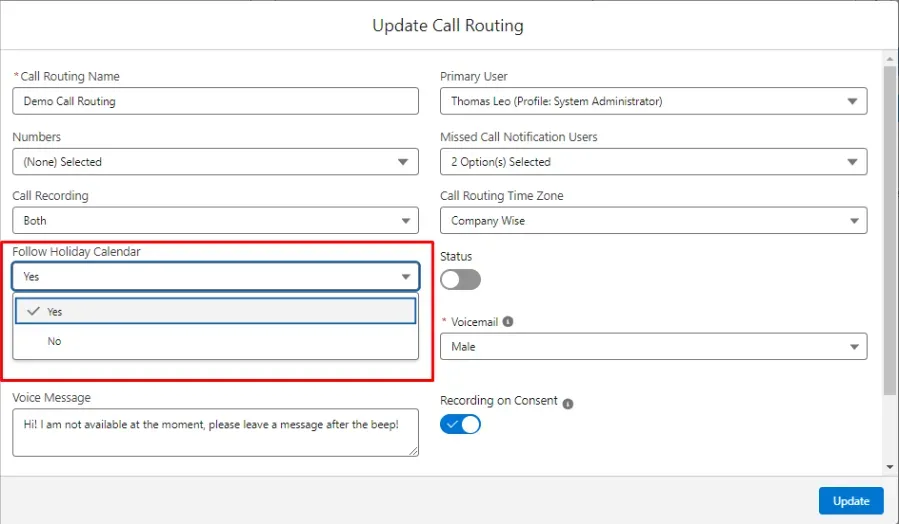
Automatically direct calls to a custom voicemail or message during holidays based on the Salesforce holiday calendar.
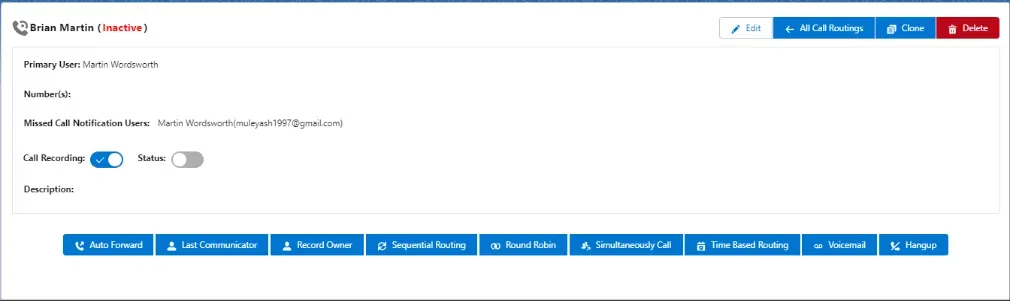
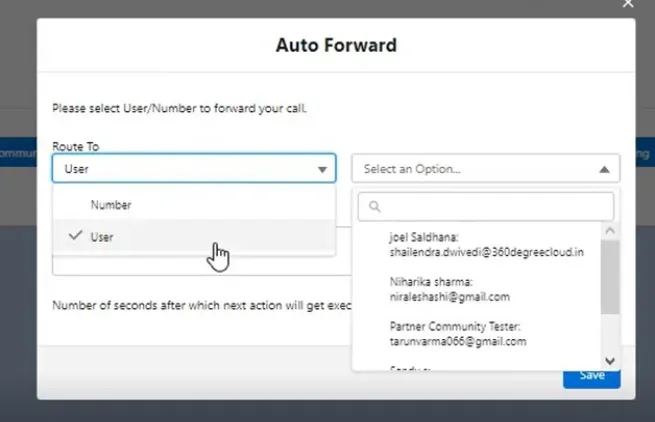
Lets you forward calls to other users or you can type in the number you want the calls forwarded to.
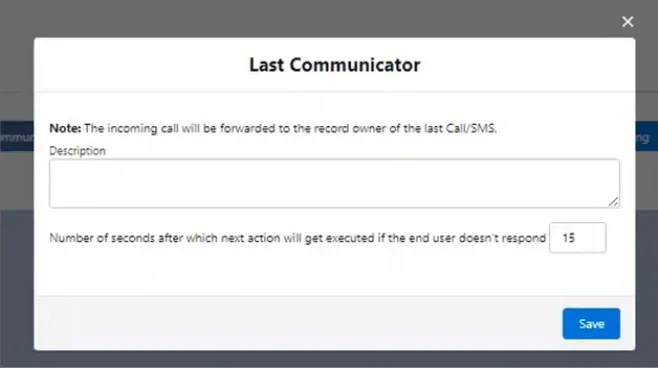
The system can auto route the call, if instructed, to the last executive the customer talked to.
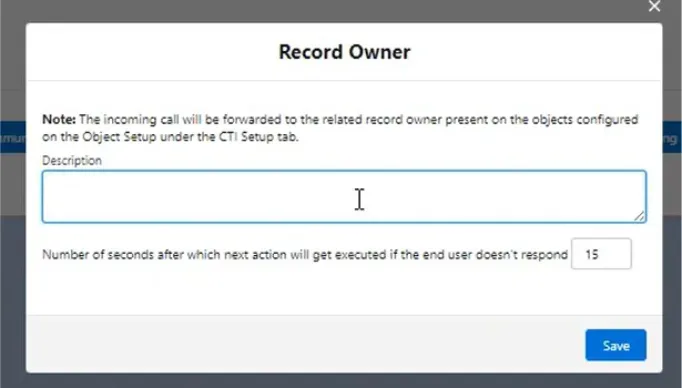
The call can be routed to the record owner (the contact owner).
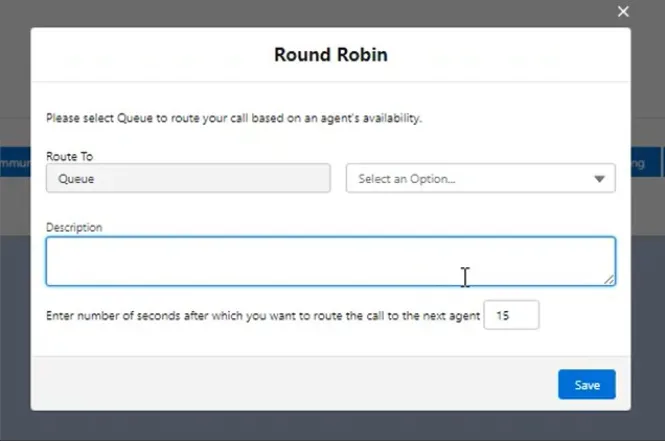
Lets you route your call to a group of people (queue), you can select the queue and number of seconds as to how long the call will ring for a particular agent.
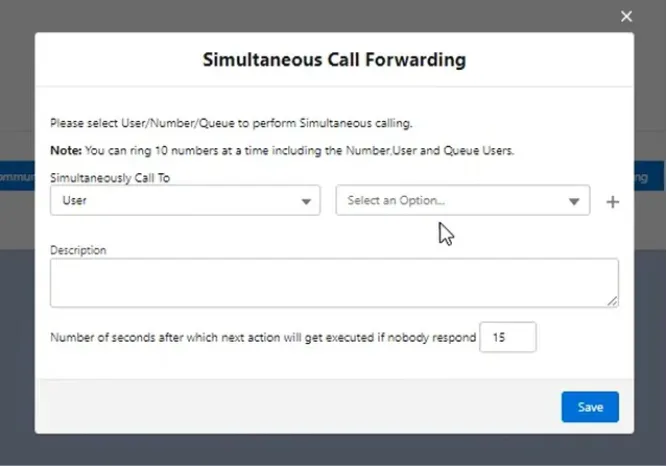
Every agent will receive the call at the same time and whoever attends the call, the task will be assigned to them. You can simultaneously call:
| a. | User |
|---|---|
| b. c. d. e. | Number Queue User & User (Mobile) Or any combination of the above three. |
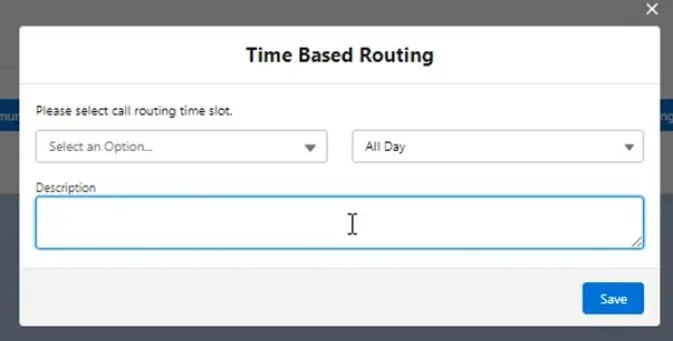
You can control the calls based on days/time. You can select weekdays, weekends, anyday or basically any combination that you like. The follow up can also be set for 24 hours or for a set period of time.
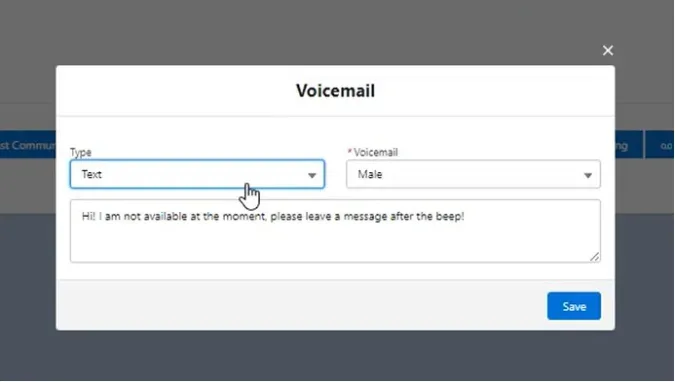
Two types of voicemail:
| a. | Text |
|---|---|
| b. Two types of voice: a. b. You can also have voicemail recorded in your own voice. | Voice Male Female |
Disconnecting the call.
Hand the call to an AI Voice Agent built in Voice Agent Setup (see the Voice Agent Setup section later in this guide). The agent can hold a natural conversation, look up or update records, and route the call to a live agent when needed. Language and voice for the agent are set once in Voice Agent Setup, not per routing step.
In this tab, records that have opted out are displayed (as shown in figure):
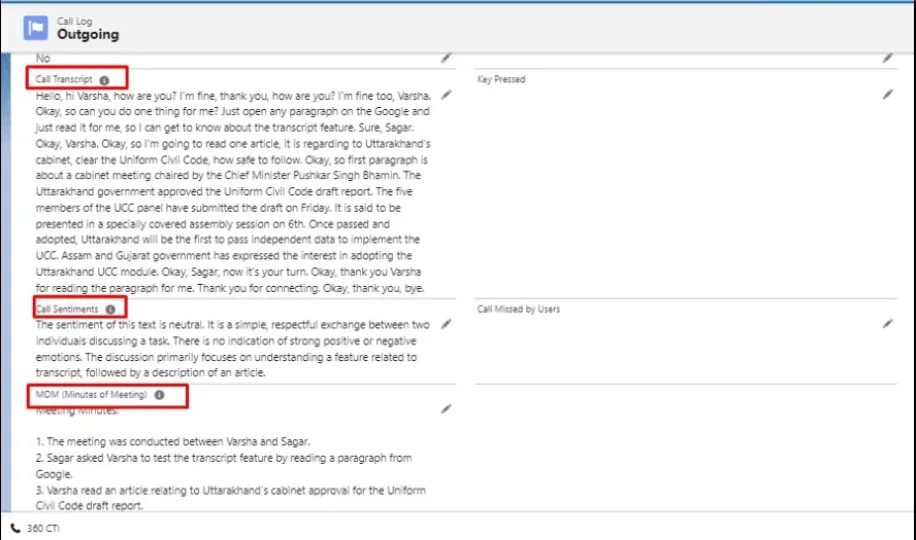
The Call Transcript feature has been introduced, allowing entire conversations to be converted into text format and stored in the 'Call Transcript' field within the Call Log Lookup field. If a call is lengthy, the transcript will be stored in the File record associated with the Call Log record. Furthermore, sentimental analysis of the call is conducted, and the information is stored in the 'Call Sentiments' field within the Call Log Lookup field. Additionally, a Minutes of Meeting (MOM) summarizing the entire call is generated and stored in the 'MOM (Minutes of Meeting)' field within the Call Log Lookup field.
Note: To enable this feature please connect with the 360 Support Team.
Live Call Transcript in the Softphone Live transcription now lives inside the Softphone itself, not as a component on the record page (the option to add it to record pages has been removed). It only appears if an OpenAI Key is set in AI Settings — leave that field blank and the Live Transcript panel won't show.
Multi-Language Transcripts for Call Monitoring Set Transcript Preferred Language on your My CTI Setup page, and the live transcript displays in that language whenever you use Call Monitoring – Listen. This applies only to Listen mode — not to your own normal calls or other Call Monitoring actions.
AI Credit Status The AI Credit Status field on a call's transcript only appears when something needs attention — an expired API key or exhausted AI credits/quota — rather than showing all the time.
Note: if you recharge AI credits after a quota expiry, click Sync Transcription on the call record to pull in the updated transcript.
Call Insights Call Insights adds AI-generated coaching suggestions to the post-call transcript, based on the Call Insights Instructions field in AI Settings. Default instructions are included on install and upgrade; clearing the field turns Call Insights off.
Call Score Call Score rates a call from 1–100 based on the Call Score Instructions field in AI Settings (default instructions included; edit or clear to change the criteria). A user's average Call Score is recalculated daily and shown on their My CTI Setup page — they need to open My CTI Setup, click Edit, then Save once for it to start appearing in Reports. Call Score requires Post Call Transcript to be enabled.
Call Coaching Call Coaching surfaces AI-generated feedback on the Softphone's Call Coaching tab, working alongside Call Monitoring's Listen, Join, and Call Whisper features.
Creating a Calling List:
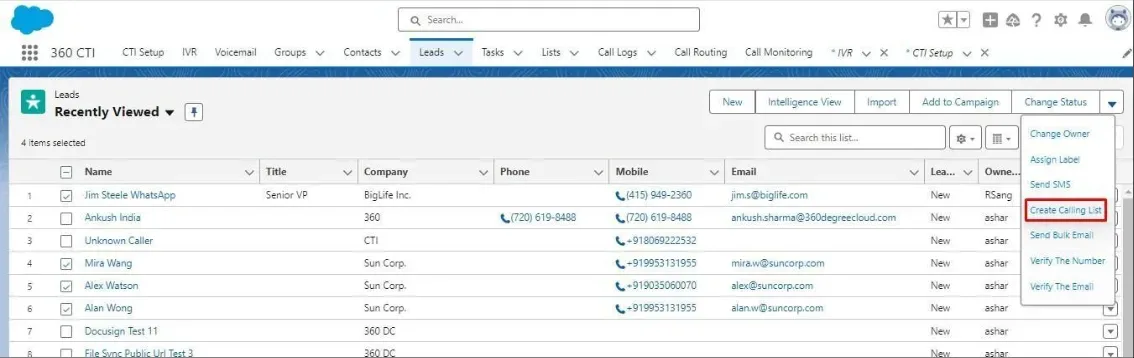
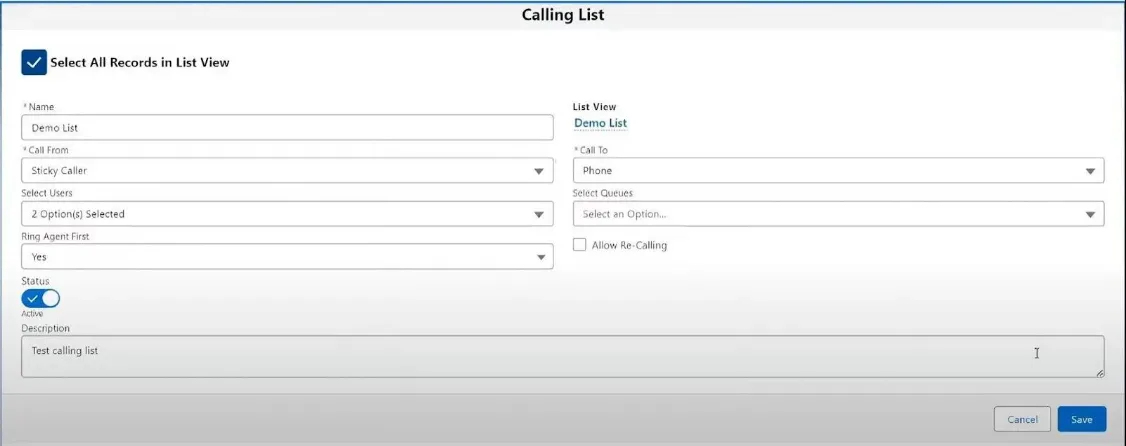
Custom List View: Begin by creating a custom list view with filters that meet your requirements.
Select Records: You can create a calling list by selecting specific records or all records within the list view.
Name Your List: Define a name for easy identification (e.g., "Demo List").
Call From Field: Choose numbers that are accessible to the user or use the Sticky Caller option for dynamic number assignment.
Sticky Caller Option:
This feature allows the call to be processed based on a dynamically assigned number, improving the efficiency and flexibility of the calling process.
Assigning Users or Queues:
You can assign the calling list to specific users or groups (queues). The system ensures that users can only access records for which they have the required permissions.
Ring Agent First:
If enabled, the call will connect to the agent’s softphone before reaching the customer. If set to "No," calls will directly connect to the customer.
Calling List Status:
You can toggle between Active and Inactive status for the calling list, depending on your operational needs.
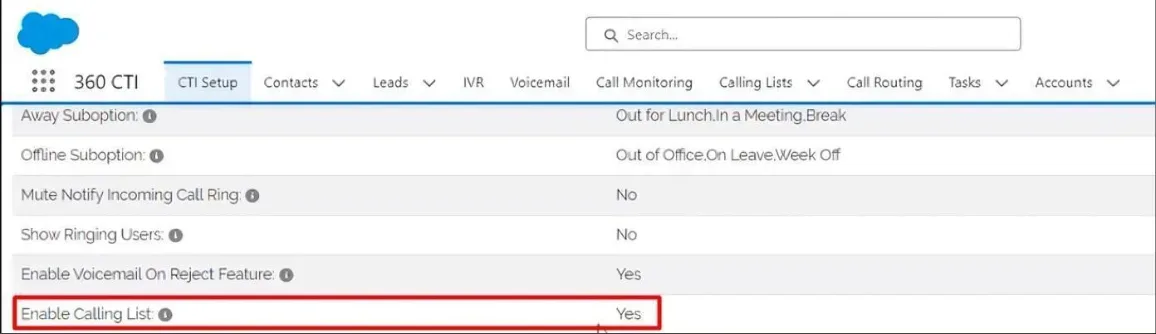
● Fig: 96 Enable Calling list feature in General Settings Predictive Dialer Predictive Dialer is a calling mode for Calling Lists that automatically places multiple simultaneous calls and connects the first one a customer answers to an available agent, cutting agent idle time between calls.
To enable Predictive Dialer, follow the below steps:
Navigate to CTI General Settings >> Enable the Predictive Dialer setting >> Open (or create) a Calling List >> The Predictive Dialer fields appear on the Calling List Detail page
Note: two limitations to keep in mind — (1) some virtual/VoIP numbers (e.g. Google Voice) may report a call as Connected as soon as it starts ringing on the agent's side, before the customer actually answers; (2) Predictive Dialer doesn't yet distinguish a human answer from voicemail, so a call reaching voicemail can still connect to an available agent, and the voicemail greeting may already be playing when they pick up.
Multiple Users:
A calling list can be used by multiple users simultaneously. The system ensures that records are evenly distributed and that each user works on unique records.
If one user goes on a break, the system intelligently picks up where they left off while allowing other users to continue making calls.
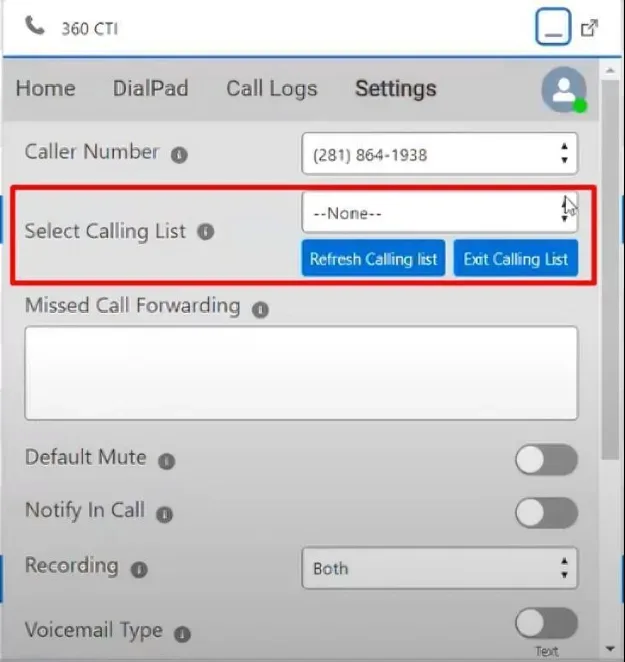
Pause and Resume:
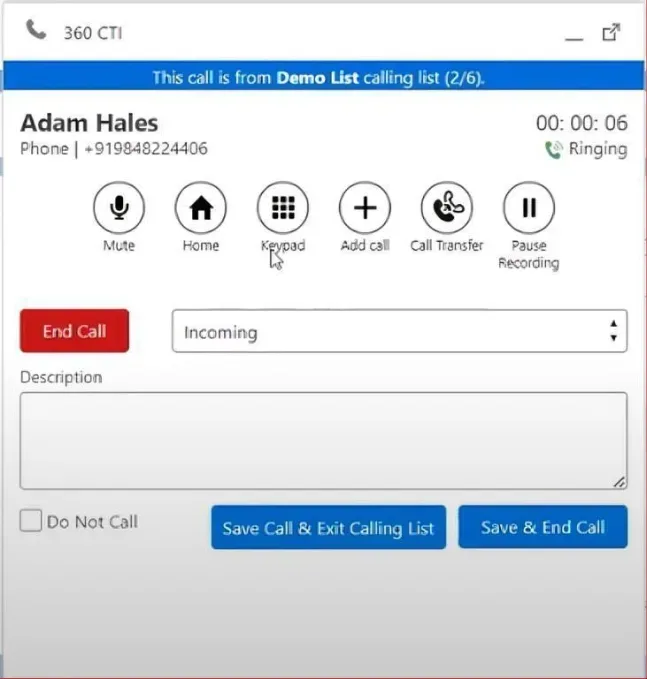
Users can pause their calling session by selecting Exit Calling List. Upon resuming, the system will automatically continue from where the calling list was paused.
Syncing with List View:
If you modify filters after creating the calling list, use the Sync Calling List button to update the list with new records based on the latest filters.
Refresh Button: Refreshes the list to reflect any real-time changes in records.
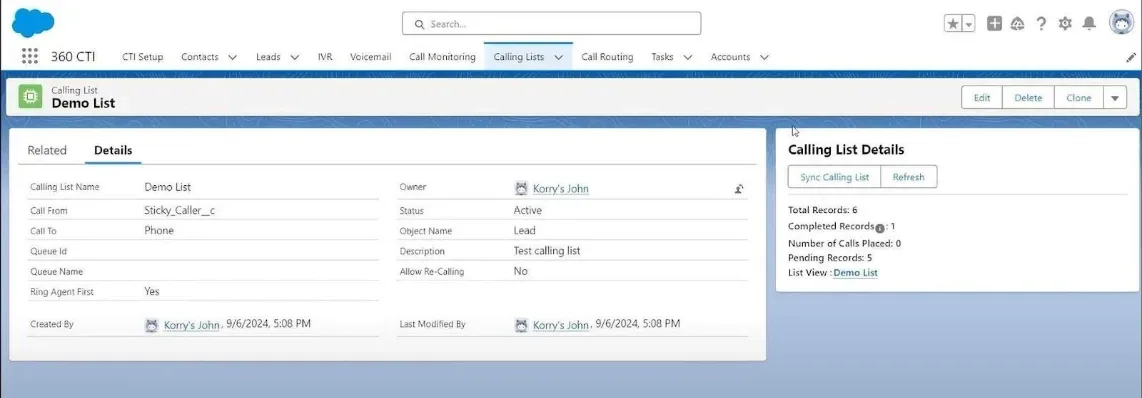
Key metrics like total records, completed records, pending calls, and number of calls placed are clearly displayed. This helps in monitoring the progress of the calling session.
Advanced Features Handling Incoming Calls:
If an agent receives an incoming call while using the calling list, the calling session will automatically pause. Once the incoming call is completed, the system resumes the calling list without manual intervention.
Multi-Tab Control:
The system restricts calling activity to a single active tab. If multiple tabs are open, the calling list will only function in one, preventing any errors from multiple tabs.
Do Not Call (DNC) Compliance:
The system automatically skips any records marked with DNC (Do Not Call), ensuring regulatory compliance.
Voice Agent Setup is where you build the AI voice agents used as a step in Call Routing, IVR, Calling Lists, and Voice Broadcast (see those sections) to hold live conversations with callers.
Note: this section covers the essentials. For a complete build walkthrough, see the dedicated 360 CTI Voice Agent feature guide.
Prompts and Functions
Note: this section covers what's confirmed in recent release notes. Voice Broadcast has more foundational functionality than is captured here — treat this as a starting point, not the full picture, until a dedicated walkthrough is written.
Voice Broadcast sends an automated call — a recording, IVR-style prompt, or Voice Agent — to a list of numbers without needing a live agent on the line, and can be scheduled to run daily, weekly, or monthly.
Email: care@360smsapp.com Phone number: +91 806 902 7849 Website: Click here
Need help setting this up in your Salesforce org? Talk to a 360 CTI expert and get it working for your team.
Talk to an ExpertEverything agents and admins need to use 360 CTI in India: calling from Salesforce, routing, IVR, voicemail, recordings, AI transcripts and setup.
Read Guide →Set up 360 CTI AI features: the AI Voice Bot, live call transcription, auto call tagging, sentiment analysis and live call coaching.
Read Guide →Where to find call transcripts in Salesforce and what each AI field on the Call Log means, from sentiment to action items and call scores.
Read Guide →